There are two ways to take the background out of a picture, and almost every article about this pretends there is one. A neural segmenter guesses which pixels are the subject. A flood fill removes pixels that match the background and are joined to the edge of the frame. They fail at opposite ends, and knowing which one you need takes about ten seconds of looking at your own photograph.
The short version: if your subject sits on a plain backdrop and is a different colour from it, the fill is exact. Miss either half and it will either do nothing or quietly delete your subject along with the background.
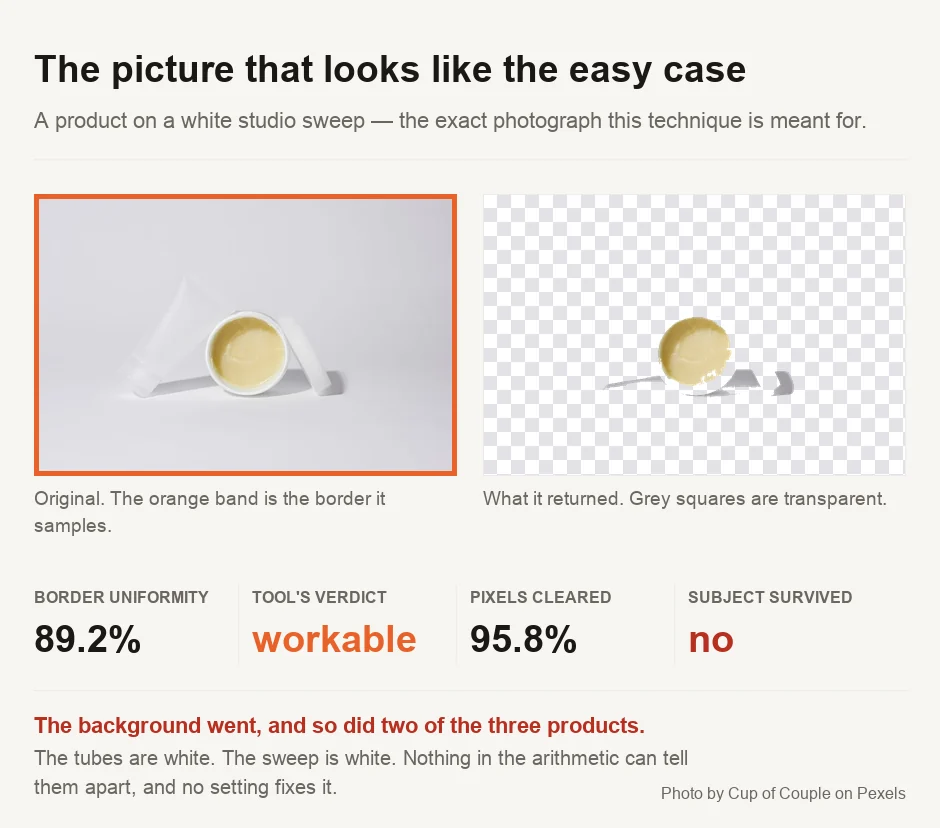
Here is what skipping the second half costs, on the exact kind of photograph this technique is supposed to be for.
The five steps
- Look at the border of your image, not the subject.
The fill starts at the edges of the frame and works inward, so the border is what decides everything. A product on a white sweep has a uniform border. A holiday photo does not, no matter how obvious the subject looks to you.
- Then check the subject is a different colour from that border.
This is the step the picture above fails. A uniform background is necessary, but not sufficient. A white mug on a white sweep gives a perfect border reading and then vanishes when you run the tool. If subject and backdrop are close in value, stop here and use a model.
- If both hold, use a local tool and keep the file on your machine.
Nothing needs to be uploaded for this. A flood fill is just arithmetic. It runs in the browser and gives back a result that is correct, not a guess.
- Check the subject survived, not just that the background went.
The failure that costs you time is not a background that stays. It is a subject with a hole in it. Look at the cut-out on a chequerboard before you save it, because a hole and a white patch look identical on a white page.
- Save as PNG, and only PNG.
JPEG has no alpha channel. Exporting a cut-out as JPEG fills the transparency, usually with black or white, and destroys the work in the last five seconds. PNG and WebP both carry transparency.
What the fill actually does, measured
These figures come from running our own tool over test images whose correct answer is known by construction, so they describe what the software does rather than what its documentation claims.
On a 400 by 300 image with a 120 by 120 object on a flat background, the background is exactly 105,600 pixels. The fill removed 105,600. Not approximately: the border was uniform, the subject was a strong colour, and there was a right answer that the fill found all of and nothing else.
On an image with a busy, multicoloured border, the same tool reported 0% border uniformity and removed 0 pixels — not because it stopped, but because there was nothing matching the border colour for it to spread into. To be precise, the tool warns you and then does as it is told. The street photograph further down was graded poor, and the tool still removed a seventh of it when the button was pressed anyway.
Why "just increase the tolerance" is bad advice
Tolerance is how far a pixel may differ from the background and still count as background, and it is the setting every tutorial tells you to adjust. Here is what it actually did on a clean image with the subject a strong colour against a near-white backdrop:
| Tolerance | Background removed | Subject intact |
|---|---|---|
| 4 | 88% | yes |
| 8 | 88% | yes |
| 12 | 88% | yes |
| 20 | 88% | yes |
| 35 | 88% | yes |
| 50 | 88% | yes |
The number never moves. When the subject is distinct from the background, every tolerance in the usable range gives the same, correct answer. There is nothing to tune and nothing to gain by fiddling.
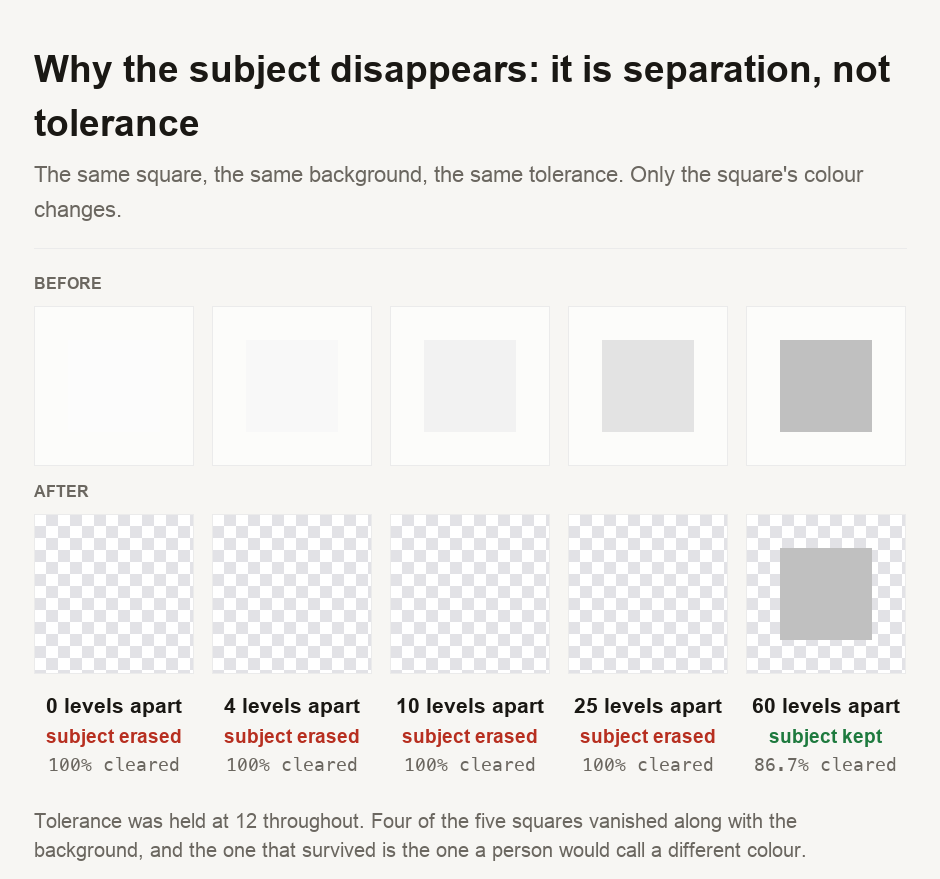
Now the variable that does decide the outcome. Holding the tolerance fixed and moving the subject's colour steadily closer to the background:
| Subject differs by | Background removed | Subject survives |
|---|---|---|
| 0 levels | 100% | no |
| 4 levels | 100% | no |
| 10 levels | 100% | no |
| 25 levels | 100% | no |
| 60 levels | 86.7% | yes |
Between 25 and 60 the outcome flips from destroying the subject entirely to keeping it. This is the whole game, and it is decided when the photograph is taken, not afterwards. The dial that matters is not tolerance; it is separation. The cosmetics photograph at the top of this guide is that table happening to a real picture.
When you actually need the model instead
Three cases, and they are not close calls.
Hair, fur and anything fine. A pixel containing one strand of hair is part hair and part background at once. No threshold can classify it correctly, because the true answer is a fraction. Segmentation models predict a soft mask, which is the right kind of answer for a fractional problem.
Any photograph taken outdoors. There is no single background colour to match, so there is nothing for a fill to do.
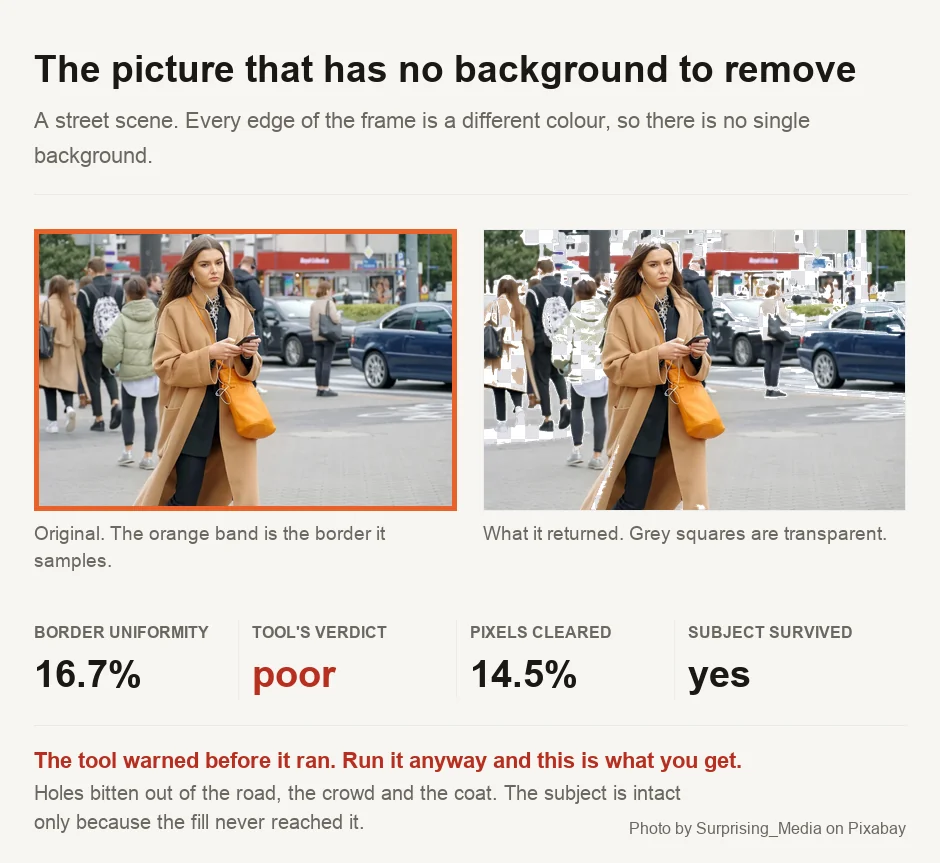
Note what did not happen. The woman is untouched, but that is not the tool getting the subject right. The fill simply never reached her, because nothing on the way in matched the colour it sampled at the frame edge. A subject that survives by accident is not a cut-out, and the fourteen per cent that vanished came out of the road and the crowd.
A subject the same colour as its background. A white mug on a white sweep defeats everything threshold-based, and models handle it because they use shape and context rather than colour alone. Photographers solve it with a coloured backdrop or a rim light, which remains cheaper than fixing it afterwards.
The hosted services worth knowing are in our directory: Remove.bg is the benchmark for hair and fur, Photoroom and PixelCut are built around product photography, and Clipdrop bundles removal with a wider editing set. All of them upload your image, which is the trade you are making in exchange for handling the hard cases.
What this audit found in our own tools
This guide has a companion tool, and it was built for this guide rather than the other way round: we had eight image tools and no background remover, so there was nothing of ours to send you to.
We made it deterministic, not a model. That makes it a worse tool for hard pictures but an honest one for easy ones, and it means nothing gets uploaded. It also judges your image before you press anything, because the failure mode of colour-based removal is not an error message. It is a plausible-looking cut-out with holes in it, after which people conclude the software is bad rather than that the method was wrong for the photograph.
Testing it for this guide produced a result we did not want and have kept. The studio photograph reads 89.2% border uniformity, which the tool grades workable and which is fair as a description of the border. The cut then destroyed two of the three products, because the warning is about the backdrop and says nothing about whether the subject is distinguishable from it. This is a gap between what the tool measures and what you need to know, which is why step 2 above exists. The street photograph, by contrast, reads 16.7% and is graded poor before anything runs, which is the warning working as intended.
Two more things were found while building it, both in our own work. The first test suite passed while two deliberate breakages went undetected: seeding the background colour from a single corner instead of the whole border, and letting the fill spread diagonally. Both survived because every test image had a uniform border and a rectangular subject, so neither breakage changed any result. We added fixtures that could tell the difference, and both breakages now make the tests fail as they should. Then we found that our first attempt at the diagonal test was itself wrong, failing against a kernel that was working properly.
Judge the border, then judge the subject against it. Both take a second to look at, and the second one is the one that eats your photograph. Use a local tool when the background is plain and the subject is not the same colour as it — the result is exact, it is instant, and your picture stays on your machine. Use a hosted model for hair, for outdoors, and for anything where subject and background are close, and accept the upload as the price of a genuinely hard problem. Stop adjusting the tolerance once the background has gone, because past that point it removes your subject and nothing else. And save as PNG, since JPEG cannot store transparency and will quietly fill it in.
Run your own numbers
Our background remover does the local version, measures your border before you start, and never uploads anything. If the file is simply too big or the wrong shape first, the image resizer and image format converter handle those, and the image compressor is what to reach for once you have a cut-out and need it small enough to publish.
- Every synthetic figure was produced by running our own shipped background-removal kernel over test images whose correct answers are known by construction — a 400 by 300 frame with a 120 by 120 object has exactly 105,600 background pixels, so "the fill removed all of it and nothing else" is a checkable claim rather than an impression. The script is committed alongside the guide and the figure check re-runs it.
- The two photographs were run through the same kernel at its default tolerance, and neither was tuned to make a point. Both were fetched through our image engine, so both are self-hosted and carry provider attribution: the studio shot is by Cup of Couple on Pexels, the street scene by Surprising_Media on Pixabay. The before-and-after panels are the raw output, composited over a chequerboard so that transparency is visible.
- Ownership details for the hosted services were checked rather than assumed: Remove.bg belongs to Canva, which acquired its Vienna-based creator Kaleido AI in February 2021, and Clipdrop was sold by Stability AI to Jasper in February 2024. Both facts were already correctly recorded in our directory entries.
- ⚠️ Colour distance in our tool is measured in RGB, which is not how human vision works — perceptually uniform spaces exist precisely because equal numeric steps are not equal visual steps. RGB is used because it is predictable and because a person moving a slider is applying their own perceptual judgement anyway. The separation figures should be read as the tool's arithmetic, not as a claim about what an eye notices.
The measurements here describe one implementation — ours — on two photographs and a set of synthetic fixtures. Other flood-fill tools use different colour distances, different connectivity rules and different defaults, so their numbers will differ even where the method is the same.

View author profile → · Editorial policy