OpenCode is an open-source AI coding agent that lives in your terminal. You type what you want in plain English — "add input validation to the signup form", "explain why this test is flaky" — and it reads your codebase, proposes changes, and applies them as reviewable diffs. Unlike single-vendor agents, OpenCode is provider-agnostic: the project advertises support for 75+ LLM providers through Models.dev, including local models, so you can point the same tool at Anthropic, OpenAI, Google, a cheap open-weights API, or an Ollama model running entirely on your own machine. It is also, by our count, the most-watched tool in its class: OpenCode currently sits at number one in our coding-agent traction leaderboard with 185.5k GitHub stars (RECATOOLS traction data, 15 Jul 2026).
This guide walks through a real installation, not a theoretical one. Every command below was executed on a Mac running macOS 26.5.1 on Apple Silicon, against OpenCode v1.18.1, on 15 July 2026. By the end, you will have installed OpenCode via Homebrew, connected it to a model provider, and launched its interactive terminal UI inside one of your own projects.
Step 1: Install
The project README lists several install paths and flags the Homebrew tap as the recommended one — it stays current with releases automatically. That is the path we tested:
brew install anomalyco/tap/opencode
🍺  /opt/homebrew/Cellar/opencode/1.18.1: 4 files, 137.5MB
On our machine the formula resolved to version 1.18.1 and the install completed in a couple of seconds (the binary itself is about 137 MB, so the download is the slow part on the first run). Note the anomalyco/tap/ prefix: OpenCode ships from the project's own tap, not from Homebrew core, so a bare brew install opencode may resolve to something else or nothing at all. Type the full tap path.
If you don't use Homebrew, the README documents two mainstream alternatives: an install script (curl -fsSL https://opencode.ai/install | bash) and npm (npm i -g opencode-ai@latest). All three produce the same binary; the tap is simply the easiest to keep updated on a Mac. Whichever route you take, you don't need Node, Python, or any runtime installed for OpenCode itself — it's a self-contained binary.
Step 2: Verify
Confirm the install landed and you're on the version this guide covers:
opencode --version
1.18.1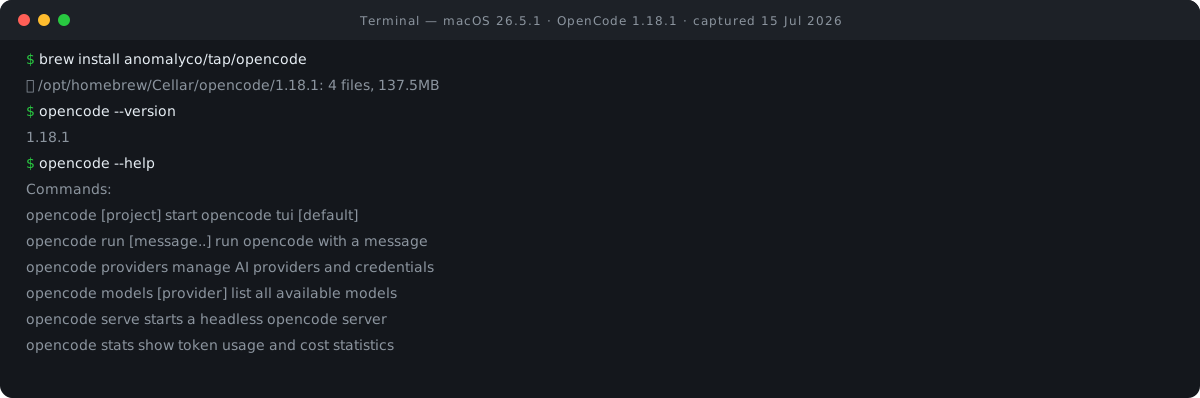
Ours printed 1.18.1. Then run opencode --help to see the command surface. v1.18.1 exposes a fairly large toolkit — MCP server management, an Agent Client Protocol server, session export/import, a GitHub agent — but for day-to-day use, six commands matter:
| Command | What it does |
|---|---|
opencode | Starts the interactive terminal UI (TUI) in the current directory — the default command |
opencode run [message..] | Runs OpenCode with a message non-interactively — one prompt in, results out |
opencode providers | Manages AI providers and credentials (aliased as opencode auth) |
opencode models | Lists every model available from your configured providers |
opencode stats | Shows token usage and cost statistics for your sessions |
opencode serve | Starts a headless OpenCode server, for API access rather than terminal use |
There's also opencode upgrade for moving to a newer (or specific) version later, and opencode uninstall for a clean removal — more on that in the last section.
Step 3: Connect a model
A fresh OpenCode install cannot answer anything yet. It is an agent shell that needs to be connected to a model. OpenCode is BYOK (bring your own key): you connect it to a model provider you already have an account with, and you pay that provider directly at API rates. There's no OpenCode subscription required, and no markup on your tokens. What you actually pay depends on the model you pick and how much context each session burns, so if you want a figure before you commit, our LLM cost calculator turns token counts into a per-request and monthly estimate.
The official CLI docs give the command-line route:
opencode auth login
Select a provider: Anthropic / OpenAI / Google / …  (paste key or OAuth)
This is interactive: it presents a list of providers, you pick one (Anthropic, OpenAI, Google, and dozens of others), and then either paste an API key or — for some providers — complete a browser OAuth flow. In v1.18.1 the canonical command name is opencode providers, with auth kept as an alias, so both spellings work. Per the providers documentation, credentials added via either flow are stored locally in ~/.local/share/opencode/auth.json — they never route through OpenCode's servers. The same flow is available inside the TUI as the /connect command if you'd rather do it after launching. When you're done, opencode models should list the models your key unlocks; if it prints nothing for your provider, the auth step didn't stick.
Non-secret configuration lives separately from credentials. Per the config docs, the global config file is ~/.config/opencode/opencode.json, and you can also drop an opencode.json in a project root for per-project settings (project config takes precedence). You don't need to touch either file for a basic paid-provider setup — opencode auth login is enough — but you will need the config file for the next option.
The $0 route is pointing OpenCode at a local model served by Ollama on the same Mac. The providers doc documents this as a custom provider block in your config: an "ollama" entry using the @ai-sdk/openai-compatible npm adapter, with baseURL set to http://localhost:11434/v1 (Ollama's OpenAI-compatible endpoint) and a models map listing the models you've pulled. If you don't have Ollama running yet, our Ollama tutorial gets a local model serving on that exact port in about ten minutes. Be realistic about the trade: local models are free and private, but a model that fits in a MacBook's memory will code noticeably worse than a frontier API model. For the exact JSON shape and current field names, work from the providers doc rather than copying config from old blog posts — this section of the config has evolved across versions.
// ~/.config/opencode/opencode.json — shape per the providers doc (verify fields there)
"provider": {
  "ollama": {
    "npm": "@ai-sdk/openai-compatible",
    "options": { "baseURL": "http://localhost:11434/v1" },
    "models": { "qwen3:1.7b": {} }
  }
}
Step 4: First run
OpenCode works on the directory you start it in, so launch it from inside a real project:
cd ~/code/your-project
opencode
The bare command opens the TUI — a full-screen terminal interface with a prompt box at the bottom. The getting-started docs recommend making /init your first action in a new project: it analyzes the codebase and writes an AGENTS.md file to the project root, which OpenCode reads on future sessions to understand your stack and conventions. Commit that file. If you'd rather write those conventions yourself than have them inferred, our AI coding rules builder generates an AGENTS.md-style rules file you can paste in and edit. Then ask for something small and verifiable — "explain what this repo does", or a one-file change — before trusting it with anything structural. Expect the first response to take longer than a chat website; the agent is reading files and building context, not just completing text.
For scripted or one-shot use, skip the TUI entirely: opencode run "your message" runs OpenCode with a message and exits, per the built-in help. It's the right shape for quick questions from a shell, aliases, and automation experiments — same agent, no interface.
Good habits
Start in a git repo, always. OpenCode edits files. A clean working tree before each session means every change the agent makes is visible in git diff and reversible with a checkout. If a directory isn't under version control, put it under version control before pointing an agent at it.
Review diffs like they came from a fast, overconfident junior. Read every change before you commit it. Agents are excellent at plausible and merely good at correct.
Watch your spend from day one. opencode stats shows token usage and cost statistics across your sessions. Run it at the end of your first week — API-billed agent use costs are spiky and personal, and it's much better to learn your number from a built-in report than from a provider invoice. To size a single prompt or file before you send it, our token counter gives you the exact token count in the browser.
Versions & limits
This guide is pinned to OpenCode v1.18.1, installed via the Homebrew tap on macOS 26.5.1 (Apple Silicon). All commands were verified by execution on 15 Jul 2026. OpenCode ships frequently, so the command surface and config schema may have moved by the time you read this — opencode --help on your machine outranks this page, and opencode upgrade moves you to the latest release when you're ready.
If you want it gone, removal is two commands: opencode uninstall (which removes OpenCode and its related files, per the built-in help) and then brew uninstall opencode to clear the Homebrew-managed binary.
This is a Mac walkthrough only. Windows users have Scoop and other installation paths documented in the README, but we did not test them. We also didn't cover CI usage, the headless opencode serve mode, MCP server configuration, or the GitHub agent; those are real features of v1.18.1 but each deserves its own tested guide. For the tool's traction numbers, pricing posture, and alternatives, see OpenCode's directory entry — and if you're still deciding between agents rather than setting one up, the head-to-head is the better starting point.

View author profile → · Editorial policy