The keystroke is the part everyone knows. Here it is anyway, because it belongs in one place:
| What you want | macOS | Windows |
|---|---|---|
| Whole screen | Shift + Cmd + 3 | PrtScn |
| Select an area | Shift + Cmd + 4 | Win + Shift + S |
| One window | Shift + Cmd + 4, then Space | Alt + PrtScn |
| Choose where it goes | Shift + Cmd + 5 | Win + Shift + S, then Snipping Tool |
What happens next is the interesting part, and it is where most advice goes wrong. Both systems hand you a PNG, often several megabytes of it, and the moment you try to make that smaller you will find guidance written for a completely different kind of image. So, in order:
- Capture a region rather than the whole screen.
It is smaller before any compression is involved, and it is a better screenshot — nobody needs your menu bar.
- Leave it as a PNG unless something rejects it.
Chat clients, ticket systems and documents all take PNG. Converting is a step that can only cost you, so do it when a size limit forces the question and not before.
- If it must be smaller, convert to lossless WebP — never JPEG.
The rest of this guide is why, measured. The short version is that JPEG made our test screenshot both larger and worse.
A screenshot is structurally the opposite of a photograph
A photograph is continuous tone. Millions of colours, no hard edges anywhere, and every neighbouring pixel slightly different from the last. JPEG was designed for precisely that material: it throws away high-frequency detail your eye is bad at noticing, and on a photograph it is close to free.
A screenshot is the inverse. Large areas of exactly one colour, and text whose entire value is the sharp boundary between ink and background. The app window we tested contains 810 distinct colours in 940 by 560 pixels — a photograph of the same dimensions would hold hundreds of thousands. Here, that high-frequency detail is the letters.
So JPEG applied to a screenshot spends its effort destroying the only thing that mattered, and — this is the part that surprises people — it does not even get smaller in return.
What each encoder actually produced
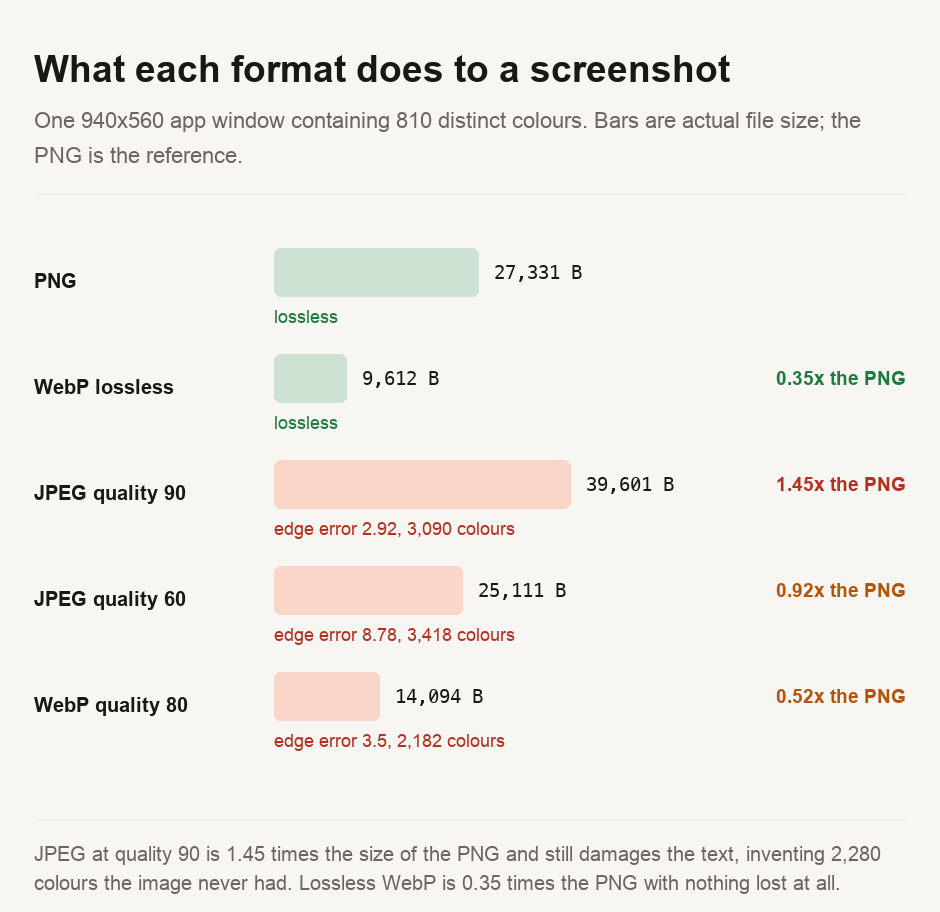
JPEG at quality 90 — the setting most compression advice recommends — produced a file 1.45 times the size of the PNG it was replacing. Quality 60, visibly degraded, saved eight per cent.
The colour counts explain the mechanism. The original held 810 colours; quality 90 turned that into 3,090. Those two thousand extra shades are ringing artefacts around every edge, and the encoder then has to spend bytes describing the noise it just created. That is how a lossy format ends up bigger and worse at once.
Lossless WebP, by contrast, was 0.35 times the PNG size. It was pixel-for-pixel identical, same 810 colours, giving up nothing.
Where the damage lands
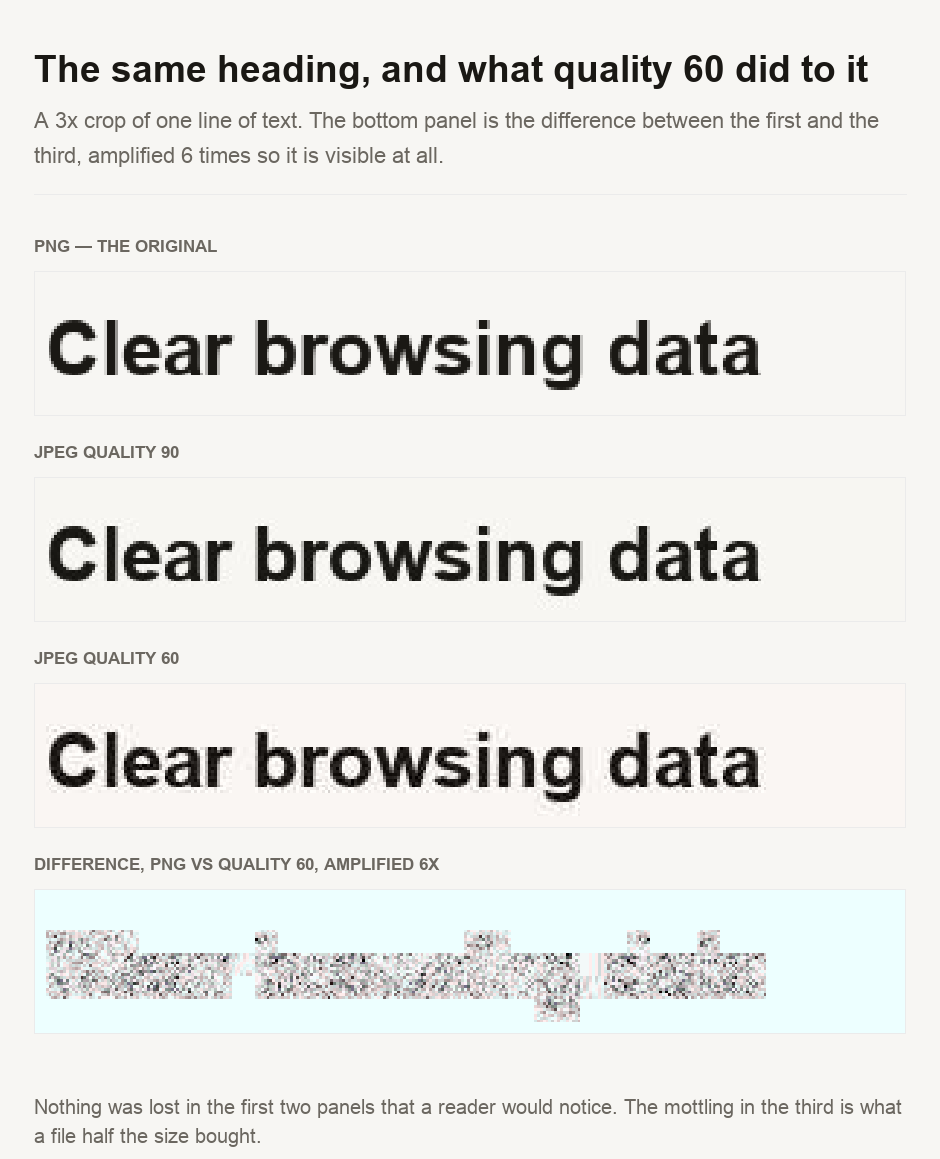
At quality 90 the degradation is measurable and invisible. At 60 the background around each letter is openly mottled. The damage lands on the text, because that is where the high-frequency detail is. It is also why the file did not shrink.
Our own converter had the same blind spot
Our own image format converter offered the right answer, but its interface steered people away from it.
The converter uses the browser's own encoder, so rather than read its code we measured what that encoder does, comparing every pixel against the original at three settings. At quality 100 it returned the image with 0 differing pixels — a separate lossless mode, not just a high setting. At 95 it had already altered 1,268 pixels.
The page did not say so. Its quality guidance — correct, for photographs — warned that pushing above 90 balloons the file for no visible gain, and the slider defaults to 85. For a screenshot that sends you to a lossy setting when a lossless one sat one notch away and produced a smaller file than the PNG. The page now explains it where the slider is described.
What we did not find matters as much: the converter's arithmetic was always correct, and its advice for photographs is sound. This was documentation, not a bug.
Capture a region rather than the whole screen; it is smaller before any compression and a better screenshot anyway. Leave it as PNG unless something is rejecting it for size — converting is a step that can only cost you. If you do need it smaller, use lossless WebP, which was about a third of the PNG here with nothing lost, and which in our converter means the quality slider at 100. Do not reach for JPEG. At quality 90 it was larger than the PNG; at 60 it bought an eight per cent saving by visibly damaging the text.
Reproducing this
The measurements are a short script, and the conversions are something you can do on your own screenshot. Our image format converter runs entirely in the browser with nothing uploaded — set quality to 100 for the lossless path. The image compressor is the tool for when the file genuinely is a photograph, and the EXIF viewer will show you what metadata a file is carrying before you send it anywhere. For the photograph side of this subject, image formats and page weight and what JPEG quality actually means cover it.
- Every file-size and colour figure comes from a script committed alongside this guide, which builds the test image, saves it in each format and measures the results. It runs in a few seconds and can be re-run by anyone.
- The measurement was made on TWO samples, not one: a synthetic app window built by the script, so its colour count is known by construction, and a real artefact from our own site. The conclusions hold on both — JPEG at quality 90 was larger than the PNG in each case, and lossless WebP was 0.35 times the PNG in each case. A conclusion that held on only one would not have been published.
- The claim about our own converter was measured in a browser rather than read from its code, because the question is what the browser's encoder does: a flat-colour image was encoded through the same canvas API the tool uses, at three quality settings, and every pixel compared with the original.
- ⚠️ "Edge error" is our own measure, not a standard one. We define it as the mean absolute difference over the pixels that sit on a sharp edge in the original. Use it to compare these formats on this image; it has no meaning as an absolute number.
Sizes depend on the image. A screenshot of a photograph behaves like a photograph, and a screenshot of a dark-mode terminal compresses differently again. The ordering held on both our samples; the exact ratios are ours.

View author profile → · Editorial policy